We were in Lowes to buy paint last week for our bedroom when we passed this display for AirStone veneers. We had been wanting to do our backsplash, and when we saw these, we knew they were perfect for the job. We finished painting the bedroom (reveal to come) and moved right on to this next project.
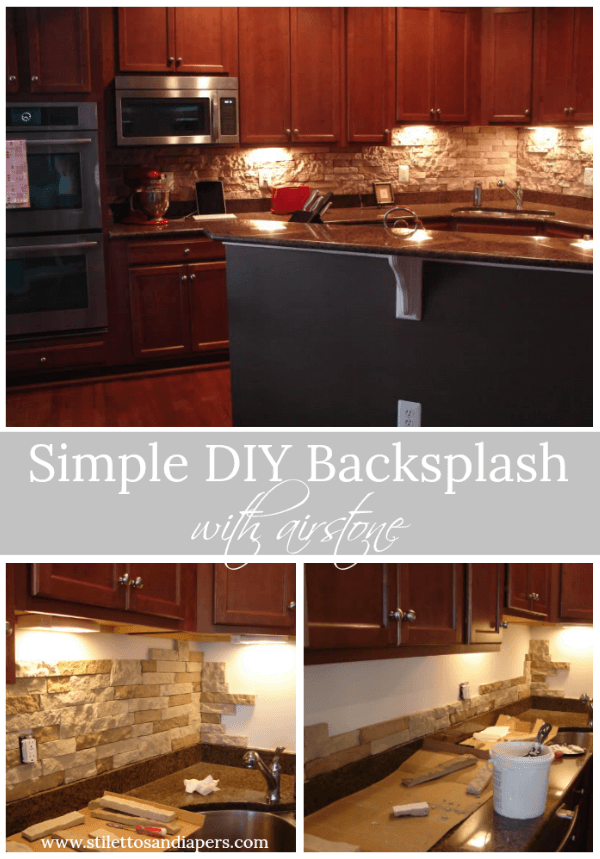
This is the kitchen before we got started.

These Airstone installation was really easy. All you do is spread the plaster and stick them up in whatever pattern you like. There were a couple color options and the boxes come with multiple sizes of “stones”.

It’s so easy a 3 year old can do it.

As your wall starts getting filled, it becomes more puzzle-like, trying to fit pieces instead of cutting. Which can be done with a hacksaw, by the way. I used my new jig-saw on a lot of the longer cuts, which was a bit faster. If you’re more of a pro than we are, you might have a saw that would make it even easier. But not necessary!

The last row at the top was the most time consuming of the whole project since all the tiles had to be cut lengthwise. But when it was finished? It was totally worth the work.


We used outlet spacers (they’re plastic and cheap in the electrical aisle of Lowes), to make the outlets stick out further than the stone. I just love the way the completed kitchen looks!
This is a reminder of what the kitchen looked like a few days before we moved in when construction was just about finished.

8 hours and $240 later, our kitchen has had a face lift. AirStone completely changes the look of the room and I’m in love!


That seriously looks amazing and so high-end! I love it. Good job, lady!
Wow I love how it turned out! It really did change the entire feeling of your kitchen. Forgive me if I have been living under a rock, but what is airstone? Are they super lightweight? Are the actual stone?
Gotta love those project that are easy-ish, relatively inexpensive and look amazing when completed!
It completely transforms your kitchen!!
I will for sure keep these in mind when I have a house of my own one day. Imagine placing these on a wall in a den or bedroom – so cool!
It looks awesome! Great job!
Looks awesome! May have to look into that as an option when we get to our backsplash this spring summer.
That looks FABULOUS! Amazing job.
Wow, looks awesome!!!!!!!!!!
Oh my gah! I LOVE! And I love the lighting under the cabinets!! Looks amazing!
We have been discussing this project for some time now. You've just convinced us! We are doing it soon. Question: where did you find that lighting under the cabs? Did it come with the house? YAY Thanks for making it look so easy as I was able to convince Dana to do this hahaha
It makes your kitchen more elegant and cozy. I love it. Do you think the stone will be hard to clean?
Looks fabulous!
We don't have a backsplash and have been looking every time we go to Home Depot (current projcet = my closet). I just can't make up my mind! Yours looks fantastic!
Looks great. You guys did a good job!
GORGEOUS! Your kitchen is a dream.
WOW! Look how much personality the stones add to your kitchen! So beautiful!! Nice job!!
Looks so good! Y'all did awesome!
It looks great!!! I love how it gives the kitchen a whole new look.
Oooh I LOVE it! The whole kitchen looks so different! We're definitely doing a backspash in our next, soon-to-be-built house, and I'd love to do it ourselves. It always seemed so intimidating. Was it really that easy to use the saw to cut the materials? That's the scariest part to me!
I love it! I'm getting ready for an easy bathroom remodel end of this week (just in time for Lovebug's 1st bday party) but the kitchen is on my to-do list. We removed ugly tile that the previous owners had for backsplash and have yet to replace it… might have to add this as a project!
Great job! And I agree with another poster here, very high–end looking!
I am totally touching this… TOMORROW!!!! EEK!
@Andrea – it is super light. I think its made with concrete, but you don't have to use a backer board or anything!
@Heather – The hacksaw was pretty easy. We used sandpaper to even out the edges. For the lengthwise cuts, the jigsaw was much easier.
Great job Molly! Ya'll did awesome!
It looks amazing!
It looks fantastic!
Absolutely love it! Was it hard to do? We are wanting to redo our fireplace with the same brick. It will be a BIG project, but it will look fabulous when we are done! Great job!!!!!
Gorgeous touch. I love love love stone.
Your backsplash looks amazing! I've been trying to decide on tiles for a backsplash and saw the product at Lowe's recently. Decided to search it on pinterest and found your blog. You sold me on the airstone and I'll be following your blog too! Thanks for sharing!
looks gorgeous!
how does it clean???
How do i find that stone? Lowes?
How do i find that stone? Lowes?
Any chance you could repost the pictures of the kitchen? The link to photobucket says it's not found.
Did you seal it? Does it clean well with kitchen splatters?
I would like to echo Tammy's post. My wife and I are considering this for our backsplash, and we are curious about sealant and kitchen clean up.
You didn't mention the electrical outlets. How do you extend them out to make it all fit? I want to do this project, but don't want it to look like I did! You got beautiful results.
The kitchen looks WONDERFUL!!
I just finished my Air Stone back splash and love the product. It was inexpensive, easy to use and looks so warm and beautiful when completed. I highly recommend this product. I bought it at Lowes.
How hard is it to clean this stone? Like splatters from food and dust? Does it wipe down easily?
Love it… am curious about the questions from commenters about outlets and cleaning.. will watch for your answers.
thanks for share.
I love that backsplash! My husband and I are in the process of doing our backsplash and an island surround with the same product, and I was wondering if you had any slight gaps that you noticed after the stone had set and if you did, what you did to help blend it back in. Our home is and older one with lots of funny shaped rooms, and things aren't perfectly level in our house, so we found a few tiny gaps (probably not any wider than coin, maybe a millimeter?) but we had white gloss paint behind it and our kitchen opens up to our back door, so when you walk in you can see the white gaps, especially when its bright outside. Just wondering if you had any ideas….?
Maybe fill it in with colored caulk that matches the stone???
We just did our fireplace and also have a couple small gaps. I'm thinking about using some tile grout that is similar in color to the lighter stone. I think that would look better than caulk because it would have the same texture as the stone.
Did you do anything special to get the outlets to go back on, was there any issues with depth?
Outlet spacers make them stick out as deep as the stone. You can get them in the electrical department at Lowes.
Hi! I have my fireplace 95% finished with Air Stone and I love it! My question is how did you cut the air stone lengthwise? I have to cut ten pieces to fit at the top and I am having difficulty – everything else was super easy.
We used a jigsaw!
I cut the air stone for my top row with a chop saw. Just did my back splash, super easy!! I think you should consider doing the back of your island as well. That would like amazing.
How do you extend your outlets?
question—-how do you set outlets out like that….???
They sell spacers at Lowes in the electrical department!
Is this the vineyard blend color? Looks great!
what is the box color you used? also have hard is it to clean??
It's extremely crooked. Stack stone can be made entirely straight, with little to no space, if done correctly.
What type of blade did you use to cut these with your chop saw?
I agree it looks lovely but also my first thought is, kitchens, grease, difficult to clean. I wonder if you would comment now on that point? thanks!
Pete, I'm in the process of installing this same project in my kitchen now. According to the manual, you should seal the stone after you're finished installing it. This will keep grease/food splatter from staining the stone and will make it much easier to clean.
Thank you so much for posting this!! My husband are in the process of putting this backsplash in because your pictures looked so, so amazing! You are 100% to credit for the way our kitchen will look in a few weeks! We are a bit new to the world of DIY, so.. it is taking us a bit longer–we are doing ours in spurts over weekends.
I have a few questions, and I would love to pick your brain..
1: I love the way that the lighting from below the cupboards highlights the stones.. do you have a specific brand/type that you would suggest?
2: is there a type of seal that you would suggest after we are done? The manual advised that, if you are putting up the arisen as a kitchen backsplash, that you should seal it after installation so that food splatter won't stain the rock and because it makes it easier to clean. We were thinking of going with a high gloss to make it almost look like wet river rock.. but I really don't know what I'm doing… any thoughts/suggestions/insights would be MOST appreciated.
Again, thank you for your blog! LOVE IT!